Hello there visitor from grumpydev.com, if you are new here, you may want to subscribe this site.
Skip to content


Why Shouldn’t I use PRISM?

Introduction

PRISM, or Composite Application Guidance/Library for WPF/Silverlight, is a library and a corresponding guidance document that helps you to build loosely coupled “composite” WPF and Silverlight applications.

The library itself “sits on top” of an Inversion of Control Container (Unity by default), and provides facilities for modularising your application, composing your UI from components, loosely coupling events and, in Silverlight’s case, only downloading parts of your application as and when they’re required.

Sounds great doesn’t it?

So, There Must Be Something Wrong With It.. Right?

Plenty has been written about PRISM, its benefits, and how to get started; but very little on why you wouldn’t use it on your next WPF/Silverlight project. I’ve put together some concerns, based both on criticisms I’ve read, and supposition on my part; and some commentary about whether I believe those concerns are well founded or not.

“I’m Only Doing a Small Project!”

Granted, PRISM is rather overkill for “toy” applications; but are you sure your application is always going to stay that small and simple? One of the big advantages of the modular nature of a PRISM app is being able to add and test new features with relative ease. I’m sure we’ve all started projects that started off as a simple little toy app, but have since grown organically into something rather more complex – possibly ending up with some pretty kludgey code at the end of it.

“It’s Complicated!”

No; it’s not. Really. There’s nothing particularly complex in PRISM, either conceptually or in the code you have to write. Once you understand the structure of a PRISM project, you’ll probably find that your code is actually easier to follow, as it is separated into clearly defined parts.

If you want an easy to follow tutorial that takes you from File.. New, through to a working application, then take a look at the excellent screencasts from Blaine Wastell’s blog.

“It Takes Too Long To Use! There’s Too Much Overhead!”

If you’ve watched some of the initial screencasts about PRISM, or had a peak at some sample code, you might be thinking that the overhead of creating all these “extra” classes and projects is just too much. While it certainly is more work than just File.. New and throwing controls on a page; once your initial project structure and bootstrapper is setup, adding new modules is no more time consuming than adding a normal User Control.

Separating your view from it’s logic; whether it be with ViewModels, the Presentation Model, or any other pattern, is going to be slightly more work; but the testability and data binding benefits far outweigh any slight increase in typing!

“It Will Add Bloat to My Silverlight App!”

The PRISM binaries, including Unity, weigh in at around 270k; and squeeze down to approximately 100k when zipped. Not exactly tiny, but not exactly Bloaty McBloater. In fact, if you take advantage of PRISM’s ability to bundle parts of your Silverlight application into different XAP files, and only load them when needed, you may find your initial payload is actually smaller than it would be without PRISM.

“You Have To Use Unity! I Don’t Want That Dependency!”

I’ve seen this repeated several times, but it’s simply not true. Although PRISM “out of the box” uses Unity, and comes with a Unity Bootstrapper; you can plug in your own IoC container without too much trouble. At the time of writing I believe there are alternatives for Spring.Net, Castle Windsor and StructureMap already written for you.

“I Want Control Over *ALL* My Damn Code!”

Firstly, if you’re writing a .Net application then chances are you are calling at least one library that you didn’t write 🙂 Secondly, PRISM is very “lightweight”. It’s a helping hand at your disposal, rather than a monolithic framework that takes over your whole application and forces you to work in a certain way. Thirdly, you can just pick and choose which parts of PRISM you want to use, it’s not an “all or nothing” proposition. Don’t like the view composition? Then don’t use it! And finally, it’s all open source, so if you don’t like the way something works – change it! 🙂

“It’s From MS – So It Sucks!”

Unfortunately if someone holds this view, then there’s probably nothing anyone can say to change their mind. While everything that comes out of Microsoft isn’t perfect, far from it, it most certainly doesn’t all suck 🙂

With PRISM, the exceedingly smart guys from the Patterns and Practices team have created an excellent set of tools and guidance to help solve some very common problems; without producing a heavy, complicated framework in the process (CAB anyone? 🙂 )

“I Can’t Frikkin’ Find It!”

Ok, I admit it, you’ve got me on this one! 🙂 Is it on MSDN? Is it on CodePlex? Both?! Is it called PRISM? The Composite Application Library (CAL)? Or maybe Composite Application Guidance for WPF and Silverlight (CAG)?

Now CAL obviously refers to the library, CAG to the guidance, and I believe PRISM is an umbrella term for the whole project, but the naming is certainly confusing, and searching for PRISM takes you to CodePlex then MSDN and back again, so it’s very easy to get confused! In fact, finding, downloading and building the library is actually MORE confusing than using the damn thing! There is actually a whole article on Sparking Client on How to Find, Download and Build Prism for Silverlight, which speaks volumes 🙂

I really don’t see what’s wrong with calling the whole thing PRISM and leaving it at that. If I say  “.Net Framework”, then most developers would know what I mean. There’s certainly no need for me to call it the “Microsoft Framework for Building Managed Applications Targeting the Windows Platform (MFBMATWP)” 😉

Tell Me More!

If you want to know more about PRISM, or if you want some walkthroughs and examples of how to use it, then here’s some links that should float your boat:

Posted in Silverlight, WPF.

Tagged with , , , , .


Sync Your Google Calendar with Your iPhone Using CalDAV

Introduction

Although you’ve been able to sync your Google Calendar with your iPhone for some time using ActiveSync, there is a limitation whereby you can only add a single ActiveSync account at one time. This isn’t a problem for most people, but if you happen to use ActiveSync for your work email, then it becomes a bit of an issue.

Enter CalDAV

One of the new features of the 3.0 firmware is the ability to add a CalDAV calendar, which it just so happens that Google Calendar also supports.

Adding your calendar to the phone is very simple:

  1. Go into “Settings”, “Mail, Contacts, Calendars
  2. Choose “Add Account…
  3. Select “Other” for the account type
  4. Under “Calendars” choose “Add CalDAV Account
  5. For “Server” you need to put “https://www.google.com/calendar/dav/YOUREMAIL@DOMAIN.COM/user” (obviously replacing the YOUREMAIL@DOMAIN.COM!)
  6. Username” and “Password” are your normal Google account details and “Description” is whatever you want it to be.
  7. Press Next, you will see an error stating that the CalDAV account could not be verified, but this doesn’t appear to actually be a problem.
  8. All done!

Now you should see your Google calendar in the Calendar app on the iPhone, and you should see it as an option when creating a new appointment. If you go back into “Settings”, “Mail, Contacts, Calendars” you can also set the Google calendar to be your default.

Posted in iPhone.

Tagged with , , , .


Surface SDK SP1 on Vista and Win7 x64

Introduction

This is a follow up post to Surface SDK on Vista x64 where we got the original Surface SDK working on the unsupported Vista X64. Last week Microsoft released Service Pack 1 of the SDK and there is an additional tweak that we need to get it going.

The original post was split into 3 sections:

  1. Patch the MSI and install
  2. Patch the Simulator and other files
  3. Configure our projects

Steps 2 and 3 haven’t changed with SP1 (we don’t need to “corflags” the new “stress” tool as it connects to the simulator rather than launching it), so jump over to the original post when you’ve got the SDK installed.

Prerequisites

  • Surface SDK SP1 (duh!)
  • Visual Studio 2008 (for corflags)
  • Orca (part of the Windows SDK or just search for it)
  • Administrator access to the Vista or Win7 box you’re installing onto.

Step 1 – The MSI

Firstly we need to use Orca to tweak the launch conditions of the MSI. Make sure you’ve installed all of the SDK pre-requisites first, then walk through the following:

  1. Install Orca (link above, or just search for it).
  2. Copy the SurfaceSDKWE.msi to somewhere on your hard disk, and make sure that it’s not Read Only.
  3. Right click on the MSI and choose Edit with Orca. This will trigger a UAC, but it’s software from Microsoft, so you should be ok to trust it 🙂
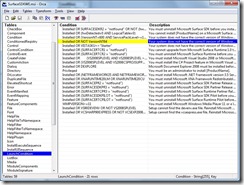
  4. Select “LaunchCondition” in the left hand list, then select “Install OR NOT VersionNT64” in the right hand list (see below).
    Remove Launch Condition
  5. Press delete and click OK when asked to confirm the row delete.

This is where we got to with the original SDK, but the SP1 install will still fail if we leave it like that. As part of SP1 Microsoft has added automatic updates and automatic error reporting. Unfortunately the exe they call as a custom action doesn’t work on x64 (it looks like it puts registry entries in the wrong place), which causes the install to fail. We could extract the MSI, patch the custom exe with corflags and then run setup, but we won’t do that because:

a) We don’t want automatic updates as they will overwrite our nicely patched exes, and
b) x64 is not a supported platform, so I’m sure Microsoft aren’t particularly interested in error reports!

Instead of that we can just continue with Orca to remove those commands from the installer:

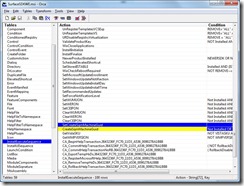
  1. From Orca, select “InstallExecuteSequence” in the list on the left and remove SetCreateSqmMachineGuid and CreateSqmMachineGuid as before:Remove Sqm
  2. Click Save on the toolbar

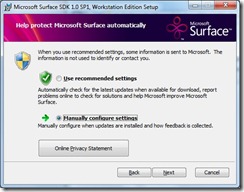
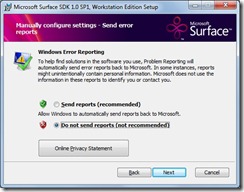
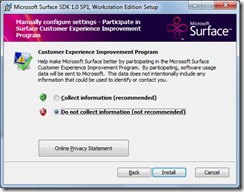
Now you can quit Orca and run the msi, which should install just fine. Make sure you also switch off automatic updates and error reporting as follows:

Surface SDK SP1 Wizard 1 Surface SDK SP1 Wizard 2Surface SDK SP1 Wizard 3

Now the SDK is installed, head over to the original post and follow steps 2 and 3 and you’re all done.

Thanks to JamesK for his workaround comment on the original post.

Update: thanks to Michael Zervos for letting me know that the academic version of the SDK comes in EXE, rather than MSI form. As he points out on his blog, if you keep an eye on your %temp% directory when you run the EXE it will extract the MSI for you to copy and patch.

Update again: Thanks to Robin Sanner for providing details on getting the samples to work:

To get the samples to build and install correctly do the following:

– Edit the configuration properties for the sample solution and create an x86 platform for all projects.
– Edit InstallSamples.bat
– Comment out the lines on either side of the set as follows:

::FOR /F “eol=H tokens=2*” %%A IN (‘REG QUERY HKEY_LOCAL_MACHINE\SOFTWARE\Microsoft\Surface\v1.0 /v IsLogicalSurfaceUnit’) DO SET LogicalTableValue=%%B
SET InstallingOnTable=false
::IF %LogicalTableValue%==0×1 SET InstallingOnTable=true

– Change the MSBuildParameters to reference the x86 PlatformName as follows:

SET MSBuildParameters=/p:Configuration=Release;PlatformName=x86 /noconsolelogger /fl /fileLoggerParameters:LogFile=%LogFile%;Append /nologo

Posted in Surface.

Tagged with , , , , , , .


Sync Live Writer Local Drafts Across Multiple Machines with DropBox

Introduction

Anyone that blogs should be using Live Writer, end of discussion. It’s brilliant in its own right (and surprisingly doesn’t just support Windows Live blogs!) and its various plugins just make life so much better for bloggers.

One of the features it has, which I’ve always found a little limiting, is the ability to save local drafts. These drafts are saved into your local Documents folder, which is fine if you blog from a single machine, but if you chop and change machines as often as you change your socks like I do, then it’s not a whole lot of use. Admittedly it does give you the option of saving drafts to your blog (with WordPress at least), but I don’t particularly want ALL my inane nonsense cluttering my blog drafts 🙂

Asking The Question

I asked Joe Cheng, one of the Live Writer developers, on Twitter about whether changing the default location was possible. Unfortunately it’s one of those features that’s “on the list” for the next major version, but not implemented this release. Jason Burns was kind enough to point out a solution using Live Mesh, which works a treat; but DropBox is my “cloud storage of choice”, and one of the first things I install on any machine, so I hacked together my own solution.

The Solution / Workaround / Bodge

One of features of NTFS, which isn’t widely used, is the ability to create “junction points”. Junction Points are very similar to symbolic links in the UNIX world – they create a file or folder that “maps” to another file or folder; so when I go to c:\myfakefolder I can actually be looking at files in c:\myrealfolder. They’re not used all that often because Shortcuts generally do a good enough job for linking one place to another; but in this scenario Shortcuts don’t cut the mustard (Live Writer will just ignore it and create its folder again), so a junction point it is!

First things first we need to copy or create the “My Weblog Posts” directory in our Dropbox, which you can just do with Explorer, then delete the original from our Document folder. You might want to back it up in case this goes horribly wrong 🙂

Next we need to create our junction point, which is easy in Vista and Win7, as they both come with utilities to manage them, but for XP or Windows 2000 you will have to download a SysInternals utility called Junction from Technet. The syntax for the two methods is slightly different, but the basic concept is the same. We tell the utility the location of the link we want to create (which will be <your documents directory>\My Weblog Posts) and where to point it to (which will be <your dropbox directory>\My Weblog Posts). E.g.:

Vista / Win7

mklink /D "%UserProfile%\Documents\My Weblog Posts" "%UserProfile%\Documents\My Dropbox\My Weblog Posts"


WinXP / Win2k

junction "%UserProfile%\My Documents\My Weblog Posts" "%UserProfile%\My Documents\My Dropbox\My Weblog Posts"

And that should be that. If you copied existing drafts to your Dropbox you should be able to see them from the Open dialog. There does appear to be a small bug in Live Writer whereby it doesn’t show you the drafts in the shortcut list on the right hand side until you’ve actually saved a draft; but you can access them just fine from the Open menu, and they’ll magically appear once you’ve saved a draft for the first time.

I worked on this post using this workaround on two different machines, so it does seem to work nicely; but as with all workarounds, please make sure you back everything up just in case!

*Update*

If you don’t want to type these commands in manually then Will Charles has created a useful little GUI utility to take some of the pain away. You can grab it over on his blog.

Posted in Misc, Rambling, Software.

Tagged with , , , .


NxtGenUG Manchester .Net User Group – All Systems Go!

Introduction

I’ve been chatting to the guys that run the NxtGenUG .Net user group for a few months about the possibility of giving some “NxtGen love” to “us northerners”, and as of this morning Manchester is now officially the 7th region!

In the words of El Presidente Richard Costall:

“NxtGenUG is about bridging the gap between Microsoft and the developer. The waves of technology emerging from Microsoft is relentless, developers are under more pressure to deliver software and also understand these new technologies.”

We’ll be kicking off in May with a main speaker still to be confirmed, so if you’re in the area then please feel free to sign up, or spread the word to anyone you think might be interested. There will be an event running on the 3rd Wednesday of each month, diaries permitting, keep an eye on the main NxtGenUG page for more news.

Big thanks to Dave McMahon, Richard Costall and John Price for their invaluable help in getting this off the ground, and no, despite the date, this isn’t an April Fool! 🙂

Posted in NxtGenUG, Rambling.

Tagged with , , .