Introduction
In this post we will extend our previous example to include a very basic “normal” WCF service, and also add a client that consumes both services. Hopefully this article will also serve as a very basic introduction to WCF services in general. If you happen to have a customer that’s asking for a WinForms app that can display some random remote data and add two numbers together, then everything you need is right here! 🙂
If you have created “normal” WCF service projects in the past you will probably be used to being able to click “Discover” in the “Add Service Reference” dialog. Unfortunately, because we’re not using a standard project, we have to do a little bit of work ourselves to get the references added.
Please see the original article for information on how we setup the project initially, and some Vista specific settings.
Server
Creating the WCF Service
Other than renaming the namespace (remembering to change the App.Config system.ServiceModel section to point to the new namespace) our server project remains the same as before. We will add a very simple WCF service that adds 2 numbers together and returns the result to the client.
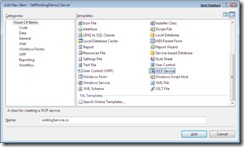
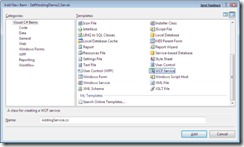
To add a WCF service we right click on the project, choose add new, and select WCF Service from the list:
This will add an interface to our project (IAddingService.cs), and a concrete class that implements it (AddingService.cs). It will also add a lot of configuration information into our app.config which we will talk about later.
If you open the interface file you will see the class and default method decorated with attributes to signify they are WCF “Contracts”. The ServiceContract attribute signifies that a particular class or interface defines a service contract for WCF, the OperationContract attribute is applied to a method to signify it’s an operation in the service (i.e. it’s a callable method), and the DataContract attribute is used to expose custom data types via the service. For this demonstration we will use a single ServiceContract containing a single OperationContract.
We’ll remove the default method that Visual Studio has added, and replace it with a method that takes 2 integers and returns an integer. Our interface definition now looks like this:
[ServiceContract]
public interface IAddingService
{
    [OperationContract]
    int AddNumbers(int a, int b);
}
If we now change our class to implement the new interface we end up with this:
public class AddingService : IAddingService
{
    public int AddNumbers(int a, int b)
    {
        return a + b;
    }
}
Service Configuration
If you now open our App.Config you’ll notice a whole raft of changes that Visual Studio has added for us. The majority of what is added is beyond the scope of this article, the only part we need to worry about for this quick demonstration is the newly added service tag. We will stick to wsHttpBinding for this demo, so we can remove the mex binding line. We will also change the default baseAddress to listen on the same port as our ADO.Net Data Servics service (but on a different url).
<service behaviorConfiguration="SelfHostingDemo2.Server.AddingServiceBehavior"
  name="SelfHostingDemo2.Server.AddingService">
  <endpoint address="" binding="wsHttpBinding" contract="SelfHostingDemo2.Server.IAddingService">
    <identity>
      <dns value="localhost" />
    </identity>
  </endpoint>
  <host>
    <baseAddresses>
      <add baseAddress="http://localhost:8751/WCFService/" />
    </baseAddresses>
  </host>
</service>
That’s it for our server – now we can move onto our client app
Client
Adding Service References
Ok, now the server is finished we will add another WinForms application to serve as our client. Once the new project is added we need to add the Service References to point to our two services.
If we were using a “normal” WCF Service project, or an ADO.Net Data Services project then Visual Studio allows us to click “Discover” in the Add Service Reference Dialog and it will automatically fire up the services and enumerate them for us. As we’re not using those project types we have to do a bit of extra work ourselves. Firstly, fire up the server application either with CTRL+F5 (start without debugging) or by double clicking the exe; we don’t want to be running in debug mode or Visual Studio may not let us add references. Once the server is running we can right click on our client project, choose Add Service Reference and point it at each of our service URLs in turn (http://localhost:8751/selfhosted/ for our data service and http://localhost:8751/WCFService/ for our WCF service):
Once that’s done we can close down our server app for now. It’s worth noting that if you alter the service and want to update the client reference then you need to go through the same process of firing up the server app before you choose Update Service Reference.
Note: These steps create “proxy” classes in our project for accessing our services. You can also create these classes using SvcUtil.exe (for WCF services) and DataSvcUtil.exe (for Data Services
Adding Some Functionality
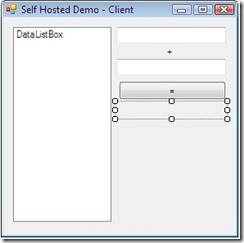
To demonstrate the application we will data bind a control to some data from our data service, and provide some controls for using our shiny new adding service. Our final interface will look like this:
Now we need to add some code :-) Firstly we will add two variables for our two services, and instantiate them in our form’s constructor:
private DataService.DemoEntities dataService;
private WCFService.AddingServiceClient wcfService;

public Form1()
{
    InitializeComponent();

    dataService = new DataService.DemoEntities(new Uri(@"http://localhost:8751/selfhosted/"));
    wcfService = new WCFService.AddingServiceClient();
}
Creating our Data Services service requires us to pass in a Uri to locate the service. We would normally store this in a configuration file somewhere, but for ease of reading it is just hard coded in this demo.
Next up we bind our ListBox to some data (customers in our case). In a real world app we would probably do potentially time consuming tasks like talking to web services in a background thread, then use the Dispatcher to update the UI, but for this demonstration we will just block the UI thread 🙂
private void Form1_Load(object sender, EventArgs e)
{
    DataListBox.DataSource = dataService.Customers.ToList();
    DataListBox.DisplayMember = "CompanyName";
}
That should look very familiar to anyone that had data bound a WinForms control before 🙂 We could use LINQ to filter the list and do other fancy things, but we’ll stick to the full list for this demo.
The code for our Equals Button is equally as simple. The proxy class that Visual Studio has generated for us has done all the hard work, so we can just call Add as we would any other method:
private void EqualsButton_Click(object sender, EventArgs e)
{
    int number1;
    int number2;

    if ((!int.TryParse(Number1.Text, out number1)) || (!int.TryParse(Number2.Text, out number2)))
    {
        MessageBox.Show("Please enter valid integers");
    }
    else
    {
        AnswerLabel.Text = wcfService.AddNumbers(number1, number2).ToString();
    }
}
Again, in a real world app we would probably put the call to the web service in a background thread and update the UI with a Dispatcher.
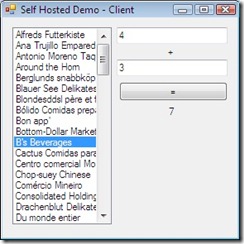
And that’s it! If you fire up the Server app, then fire up the client, you should end up with something that looks like this:
You can grab the source code for the whole thing below:
 subscribe