Hello there visitor from grumpydev.com, if you are new here, you may want to subscribe this site.
Skip to content


Passing Parameters using LoadControl()

Recently I had to put together a SharePoint 2008 Web Part and I wanted to use a User Control for the UI and pass the various Web Part settings into it.  The “standard” way to call LoadControl doesn’t allow us to pass any parameters:

LoadControl

There is an additional overload that takes a Type and a list of parameters but using that doesn’t seem to initialise any of the designer created bits, so referencing any of the sub-controls fails with a null reference exception.

One solution would be to add some public properties to the control, create it using the normal LoadControl, set the properties to the relevant values and display it.  I wasn’t too keen on that approach so instead I created a LoadControl extension method on TemplateControl that provides the following overload:

LoadControlExtension

Extension Method Implementation

The implementation of the extension methoid is very straightforward.  Firstly we take the params we are passed and pull out their types into an array:

Type[] paramTypes = new Type[constructorParams.Length];
for (int paramLoop = 0; paramLoop < constructorParams.Length; paramLoop++)    paramTypes[paramLoop] = constructorParams[paramLoop].GetType();

Once we have the types we can use GetConstructor to lookup the constructor that matches our signature:

var constructor = control.GetType().BaseType.GetConstructor(paramTypes);

Then if our constructor was found, we simply invoke it:

constructor.Invoke(control, constructorParams);

User Control

In our user control code behind we add our required constructor, but we also need to add a default constructor (one with no parameters) or the compiler gets confused and you will get a CS1729 runtime error:

public partial class TestControl : System.Web.UI.UserControl
{    
    public TestControl()    
    {    
    }

    public TestControl(Color color1, Color color2)    
    {       
        Label1.ForeColor = color1;        
        Label2.ForeColor = color2;    
    }
}

And that’s it!  A demo with the extension method class and a sample user control is available here:

LoadControlDemo.zip

Posted in ASP.Net.

Tagged with .


Taking WPF “Screenshots”

I was recently working on a Surface project at Microsoft (that will be shown at BETT 🙂 ) and one of the requirements was to provide an external “administration console”.  As part of that console I wanted to show an “screenshot” of the current game running on the Surface unit; after playing around for a while it turned out it was pretty straightforward.

We did consider sending over the RAW XAML from the Surface to the Console, but that would potentially have issues when resources weren’t available, so the approach that was taken was to create a JPG screenshot and send it over as a byte array via WCF.

Rendering to a BitmapFrame

The key to this approach is RenderTargetBitmap which allows us to render any WPF Visual to a BitmapFrame as follows:

RenderTargetBitmap renderTarget = new RenderTargetBitmap(200, 200, 96, 96, PixelFormats.Pbgra32);
renderTarget.Render(myVisual);
BitmapFrame bitmapFrame = BitmapFrame.Create(renderTarget);

Then from there we can use JpegBitmapEncoder to create a JPG from that BitmapFrame:

JpegBitmapEncoder jpgEncoder = new JpegBitmapEncoder();
jpgEncoder.Frames.Add(bitmapFrame);

Then we can output that JPG to a stream of our choice using the Save() method.

Problems

While this works for many cases, and indeed worked perfectly for the Surface application, we do encounter problems when the source we are rendering has Transforms applied or when it’s not positioned at 0,0.  When this occurs the screenshots we take will have the content shifted“out of frame” resulting in black borders, or content missing altogether.  The following screenshot demonstrates the problem:

Shifted Content Problem

Workaround

To work around the problem we can use a VisualBrush to “draw” our source element onto a new Visual, and render that with our RenderTargetBitmap:

DrawingVisual drawingVisual = new DrawingVisual();
DrawingContext drawingContext = drawingVisual.RenderOpen();

using (drawingContext)
{
    drawingContext.DrawRectangle(sourceBrush, null, new Rect(new Point(0, 0), new Point(200, 200)));
}
renderTarget.Render(drawingVisual);

It’s not ideal, but I’ve yet to find a better workaround for it.

Putting it all Together

To make it more useful, we can wrap the whole lot up into a Extension Method.  Rather than extending Visual, I’ve chosen to use UIElement so I have access to the RenderSize to calculate the required size of the output bitmap.  I’ve also included parameters to scale the resulting bitmap and to set the JPG quality level:

///
/// Gets a JPG "screenshot" of the current UIElement
///
/// UIElement to screenshot
/// Scale to render the screenshot
/// JPG Quality
/// Byte array of JPG data
public static byte[] GetJpgImage(this UIElement source, double scale, int quality)
{
    double actualHeight = source.RenderSize.Height;
    double actualWidth = source.RenderSize.Width;

    double renderHeight = actualHeight * scale;
    double renderWidth = actualWidth * scale;

    RenderTargetBitmap renderTarget = new RenderTargetBitmap((int) renderWidth, (int) renderHeight, 96, 96, PixelFormats.Pbgra32);
    VisualBrush sourceBrush = new VisualBrush(source);

    DrawingVisual drawingVisual = new DrawingVisual();
    DrawingContext drawingContext = drawingVisual.RenderOpen();

    using (drawingContext)
    {
        drawingContext.PushTransform(new ScaleTransform(scale, scale));
        drawingContext.DrawRectangle(sourceBrush, null, new Rect(new Point(0, 0), new Point(actualWidth, actualHeight)));
    }
    renderTarget.Render(drawingVisual);

    JpegBitmapEncoder jpgEncoder = new JpegBitmapEncoder();
    jpgEncoder.QualityLevel = quality;
    jpgEncoder.Frames.Add(BitmapFrame.Create(renderTarget));

    Byte[] _imageArray;

    using (MemoryStream outputStream = new MemoryStream())
    {
        jpgEncoder.Save(outputStream);
        _imageArray = outputStream.ToArray();
    }

    return _imageArray;
}

I’ve bundled the extension method class in with a small demo app and you can grab the source to both from here:

screenshotdemo.zip

Posted in Surface, WPF.

Tagged with , , .


Surface SDK on Vista x64

Update: There is a new post on this subject regarding the Surface SDK SP1, and it’s also verified working on Win7 x64 too 🙂

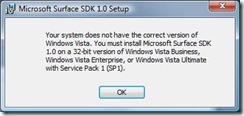
If you are lucky enough to have access to a Surface and/or it’s corresponding SDK, you may have tried to install that SDK on a 64bit Vista installation. If you did you will have been greeted by the following delightful error message:

"Your system does not have the correct version of Windows Vista. You must install Microsoft Surface SDK 1.0 on a 32-bit version of Windows Vista Business, Windows Vista Enterprise, or Windows Vista Ultimate with Service Pack 1 (SP1)."

Rather than grab a different machine with a 32bit install, I thought I’d see whether it was possible to get it up and running on x64. Although it turned out to be quite simple to get working, with no registry hackery required, there may be good reasons why this configuration isn’t supported, so use these instructions at your own risk!

To get things up and running you will need the following:

  • Orca – An MSI editor that is part of the Windows SDK. You can grab from the Microsoft download page, or wherever your search engine of choice takes you.
  • Visual Studio 2008 – You might be able to use C# Express, but I haven’t tried it.

There is nothing particularly nasty in these instructions, but it does involve using the command line.

Step 1 – The MSI

Firstly we need to use Orca to tweak the launch conditions of the MSI. Make sure you’ve installed all of the SDK pre-requisites first, then walk through the following:

  1. Install Orca (link above, or just search for it).
  2. Copy the SurfaceSDK.msi to somewhere on your hard disk, and make sure that it’s not Read Only.
  3. Right click on the MSI and choose Edit with Orca. This will trigger a UAC, but it’s software from Microsoft, so you should be ok to trust it 🙂
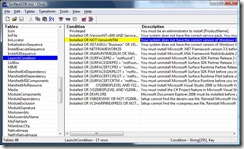
  4. Select "LaunchCondition" in the left hand list, then select "Install OR NOT VersionNT64" in the right hand list (see below).
    Orca
  5. Press delete and click OK when asked to confirm the row delete.
  6. Click Save on the toolbar.

Now if you launch are freshly edited MSI you should be able to install it just fine – hurrah! If you try and launch the simulator though then it will crash almost immediately – boo!

We will fix that though in Step 2…

Step 2 – The Simulator

The reason for the almost immediate crash is due to the assemblies being built for "Any CPU", while relying on a library than only exists for x86. When the simulator starts up it launches in 64bit mode and, because you can’t mix x86 and x64 assemblies, it tries to load the x64 version of XNA (which doesn’t exist) and promptly falls over in a giggling heap.

If this was an app we had written, we could simply change the configuration in Visual Studio to x86 and everything would be rosy (more on this later). Unfortunately I don’t happen to have the source code for the SDK knocking around, so we have to resort to a utility that comes with Visual Studio called CorFlags to force everything to load in 32Bit mode. The following instructions assume you have everything installed in default locations, but they should be easily adaptable if you don’t:

  1. Go and find the "Visual Studio 2008 Command Prompt" from your start menu (All Programs, Visual Studio 2008, Visual Studio Tools) right click on it and choose "Run as administrator" (accepting the resulting UAC prompt).
  2. Change to "C:\Program Files (x86)\Microsoft SDKs\Surface\v1.0\Tools\Simulator".
  3. Enter "corflags SurfaceSimulator.exe /32bit+ /force" (without the quotes). We need to use /force because the assemblies are strong named signed, and altering them this way will invalidate that signature. This is unfortunately unavoidable, but I haven’t found any problems from doing so. You will receive a CF011 warning informing you of this 🙂
  4. Change to "C:\Program Files (x86)\Microsoft Surface\v1.0".
  5. Use the same corflags syntax from step 3 on the following files, one by one: Attract.exe, AttractConfig.exe, SurfaceInput.exe, SurfaceOutOfOrder.exe, SurfaceShell.exe.
  6. Close the command prompt and launch the simulator!
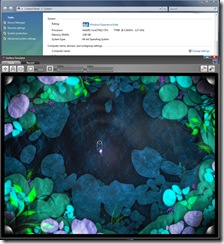
    ItWorks

Now we’re at this point we need to make sure our Surface applications are set to run in 32Bit mode, or they will just crash when we launch them. This is very simple to do in Visual Studio, and changing this is usually the first step in troubleshooting any weird and wonderful x64 development glitches.

Step 3 – Our Applications

Setting our applications to 32Bit is extremely easy. You may think this is crippling our applications a bit, but all of the Surface units are running Vista 32 so it really doesn’t make a difference (other than making them work on x64!)

  1. Launch Visual Studio 2008, and either open a solution or create a new one.
  2. Enter Configuration Manager (if you drop down the "Any CPU" box, there’s an option in there).
  3. Under "Active solution platform", select
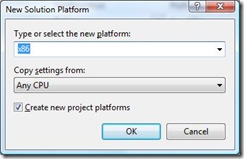
  4. Select x86 as the Type, Copy settings from Any CPU and make sure "Create new project platforms" is selected:
    NewSolutionPlatform
  5. Click OK

The Platform column for each of your projects should now read "x86", and you should be able to launch your Surface applications in the simulator.

Job done! 😀

As I said earlier, there may be good reasons why x64 isn’t a supported platform, so this method falls strictly in the "it works on my machine" camp.

Posted in Surface.

Tagged with , , , , .